Introduction
AWS makes it really easy to start a new Kubernetes cluster where you can deploy your apps while AWS takes care of managing the underlying infrastructure. Like any other managed Kubernetes on the Internet, access to the cluster is determined by the cluster itself. Most cloud providers create a bridge sort of functionality that is used to work with the IAM of the cloud.
It is interesting to note, both from security and functionality perspective, that the user who created the EKS cluster, regardless of what IAM permissions they have in AWS, will be a cluster administrator. In a future post, we will see how this could lead to a potential scenario where a user with only EKS cluster create permissions, could use the IAM role attached to the cluster to escalate their privileges in order to become an administrator in AWS.
Accessing AWS EKS using an IAM User
There are two scenarios that we need to work with -
- Creating Kubernetes cluster access for an AWS IAM user that created the cluster
- Creating Kubernetes cluster access for any other arbitrary AWS IAM user regardless of their privileges within AWS
AWS IAM user that created the cluster
If a user who created the cluster wishes to run kubectl commands then a kubeconfig can be generated using the following command. The IAM user that created the kubernetes cluster, regardless of their IAM privileges, are assigned system:masters (admin) privileges in the cluster.
Generating credentials to access the cluster for this user is very straightforward. Here are the steps for a cluster called test-cluster. You can get a list of your clusters by running aws eks list-clusters
-
Run
aws eks update-kubeconfig --name test-clusterto generate credentials and add them to~/.kube/config
-
Run
kubectl get svcto confirm credentials were generated and are working as intended.
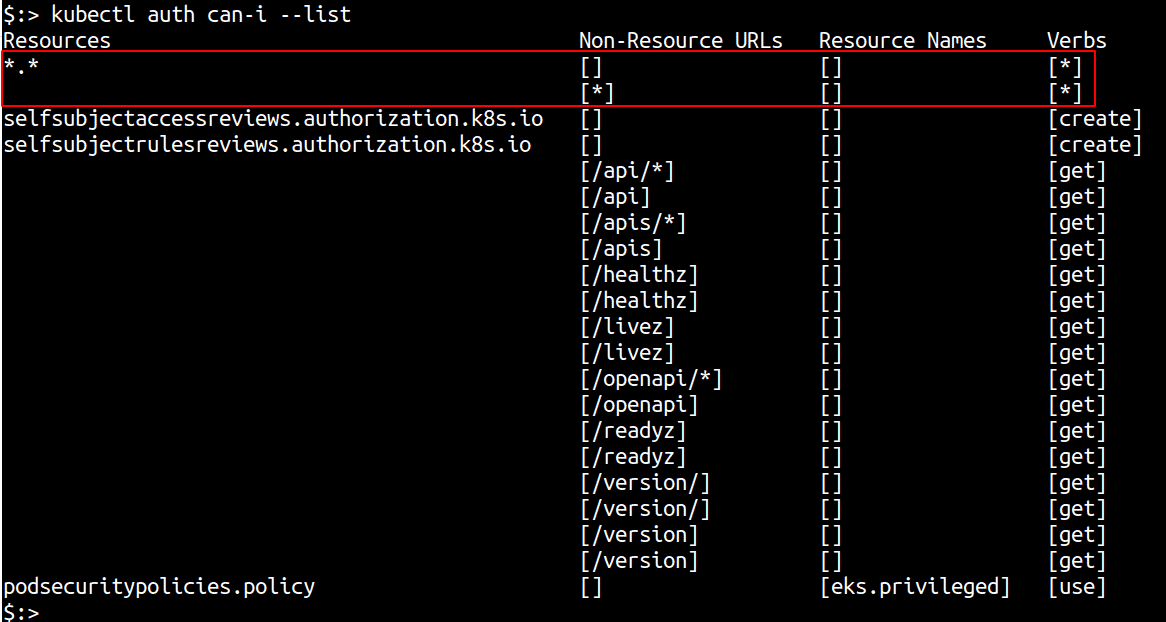
If you have kubectl’s plugin manager, krew, installed (highly recommended), then you can install the access-matrix and whoami plugins to quickly get RBAC information in an easily readable format.
kubectl auth can-i --list

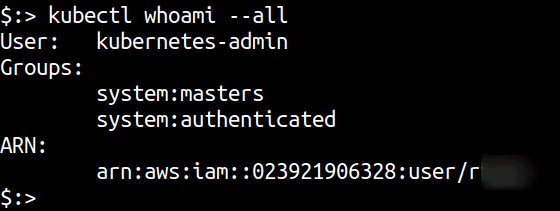
kubectl whoami —all
kubectl whoami —all

As you can see from the output of kubectl whoami —all, the user that created the cluster is automatically added to the system:masters group.
As you can see from the output of kubectl whoami —all, the user that created the cluster is automatically added to the system:masters group.
For any other arbitrary IAM user
To create a Kubernetes user and map that user to an AWS IAM user, we will need eksctl to fetch IAM and EKS Identity Mapping.
Here are the step by step instructions to do this:
- Run these commands as a cluster-admin
- In the cluster, create a new ClusterRoleBinding and ClusterRole to allow ReadAccess (
get,watchandlist) to the cluster. Save the following yaml text to their respective yaml files as named below and apply them to the cluster.
clusterrolebinding.yaml
```yaml
apiVersion: rbac.authorization.k8s.io/v1
kind: ClusterRoleBinding
metadata:
name: read-cluster-global
subjects:
- kind: Group
name: reader
apiGroup: rbac.authorization.k8s.io
roleRef:
kind: ClusterRole
name: cluster-reader
apiGroup: rbac.authorization.k8s.io
```
clusterrole.yaml
apiVersion: rbac.authorization.k8s.io/v1 kind: ClusterRole metadata: name: cluster-reader rules: - apiGroups: - "" resources: - '*' verbs: - get - list - watch - apiGroups: - extensions resources: - '*' verbs: - get - list - watch - apiGroups: - apps resources: - '*' verbs: - get - list - watch - apiGroups: - "*" resources: - '*' verbs: - get - list - watch
3. Apply these using kubectl apply -f filename.yaml for each yaml file
-
Verify if the clusterrolebinding was created using
kubectl get clusterrolebindings. An entry forread-cluster-globalshould be present. The name of the group is present in theclusterrolebinding.yaml. In this case, it is reader.
-
Obtain the ARN of the IAM user that needs to be added to EKS from AWS IAM console. You can do this with
aws sts get-caller-identity -
Run `eksctl create iamidentitymapping —cluster
—region=region-code —arn “IAM-ARN” —group —no-duplicate-arns —username 
-
Run
eksctl get iamidentitymapping --cluster <cluster-name>to get a list of AWS IAM user mapping to group in the cluster.
-
Switch to the IAM user that needs access to the cluster and regenerate the kubeconfig using -
aws eks update-kubeconfig --name <cluster-name> -
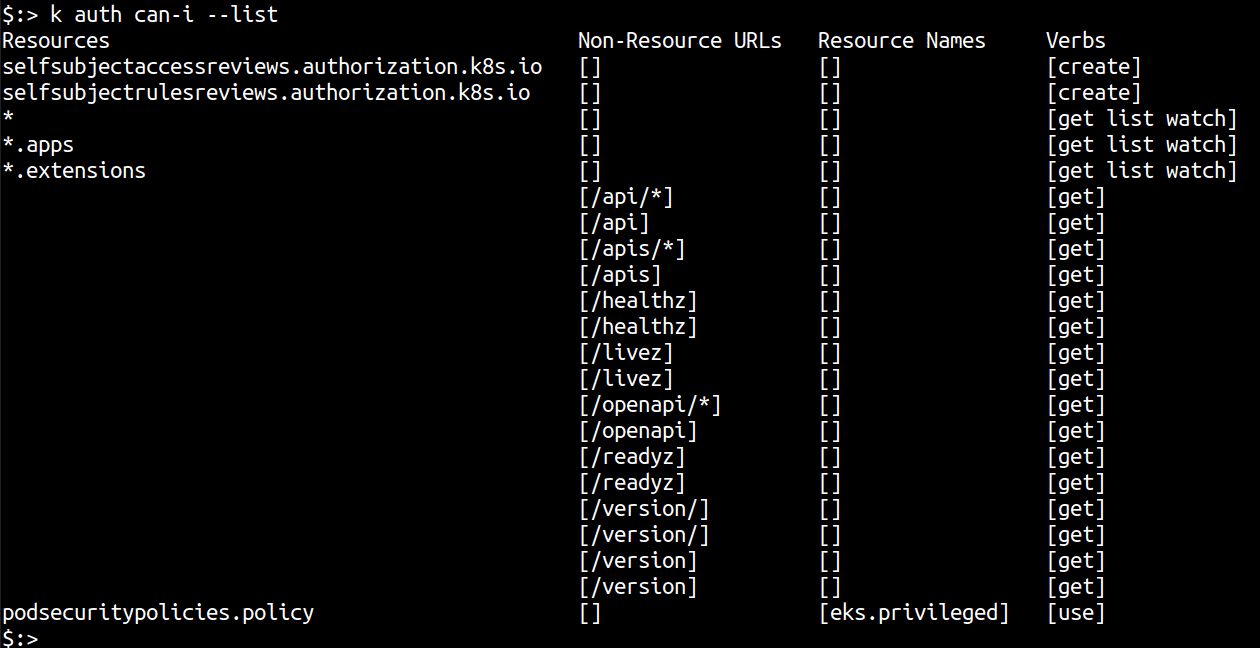
Running
kubectl auth can-i --listshould show that you now have ReadAccess to the cluster using the IAM user.
Conclusion
When administering a managed Kubernetes cluster, it is important to map the RBAC capabilities of the cluster to that of IAM users that are restricted and controlled. This ensures there is separation between the cluster RBAC roles and IAM user permissions and auto assigned administrators do not become the single point of access failure. Additionally, you can use the yaml files shown in this article to create other user roles and provide even more restricted access based on who the IAM user is.

Riyaz Walikar
Founder & Chief of R&D
Riyaz is the founder and Chief of R&D at Kloudle, where he hunts for cloud misconfigurations so developers don’t have to. With over 15 years of experience breaking into systems, he’s led offensive security at PwC and product security across APAC for Citrix. Riyaz created the Kubernetes security testing methodology at Appsecco, blending frameworks like MITRE ATT&CK, OWASP, and PTES. He’s passionate about teaching people how to hack—and how to stay secure.