Introduction
All compute instances that run within AWS can access the AWS IAM service to generate temporary credentials which can then be used to access the rest of the AWS cloud. The ability to access the IAM service to generate credentials is usually done via instance profiles attached to the compute instance and accessible via the Instance Metadata Service (IMDS). For computes running on a different cloud provider or even on premise, it was required to use long term credentials to perform actions on AWS.
AWS Roles Anywhere as a feature within AWS IAM solves this by allowing admins to set up a PKI infrastructure that can be used to authenticate non AWS workloads and generate credentials on the fly so that these instances appear to be a part of AWS (at least from the point of credential generation).
In this article we will take a look at how we can setup a simple PKI using AWS released code and enable apps to generate AWS IAM credentials from a non AWS workload at run time. The generated credentials will have the ReadOnlyAccess and IAMAccessAnalyzerReadOnlyAccess permission to ensure we begin with read only credentials. We can alway add or remove privileges by updating the role from IAM.
AWS User Session Token Temporary Access Mechanism
To set up a non AWS workload and eventually generate the temporary access token, some prerequisites have to be met.
- The machine where the IAM credentials will be generated should be a non AWS workload. You could technically perform the steps in the next section on an AWS instance but that will defeat the purpose of this feature
- The machine should have outbound/egress connectivity to the Internet. Specifically to the AWS IAM and STS API endpoints.
How to set up the instance and generate credentials
We have used an Ubuntu 20.04 virtual machine running locally for this example.
-
Download the
aws_signing_helperbinary from https://docs.aws.amazon.com/rolesanywhere/latest/userguide/credential-helper.html. Options for other operating systems are available here. -
Clone the git repo at https://github.com/aws/rolesanywhere-credential-helper to obtain PKI certificate creation scripts. We will use this to create a server certificate and a private key which are required to run the
aws_signing_helperbinary to generate temporary assume role tokens -
To build the aws_signing_helper binary, follow the steps listed under “Building the aws_signing_helper binary” and then continue here
-
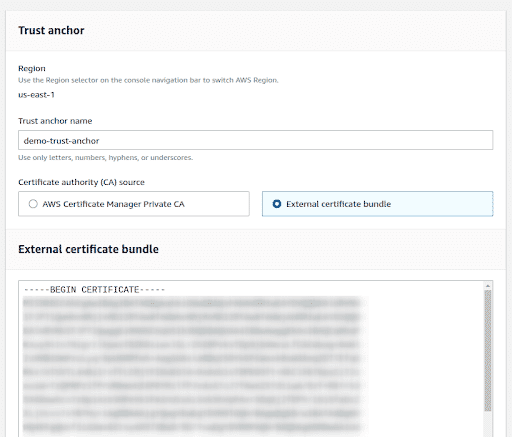
Under https://us-east-1.console.aws.amazon.com/rolesanywhere/home/ , create a new “Trust Anchor”.
-
Click “Create a trust anchor” and give a name to the anchor. This could be anything you choose that describes the connection.
-
We will use our own CA, so select “External certificate bundle.” Under “External certificate bundle,” paste your CA certificate, which can be obtained by following the steps under the “Generate CA certificate for Trust Anchor” section in this document.
-
Click “Create trust anchor” and note its ARN
-
Once the Trust Anchor is created click on “Create a Profile” under the “Profiles” section
-
Give the profile a name and follow the steps under the “Create an IAM Role that trusts the IAM Roles Anywhere Service Principal” section in this document
-
Add the role that we just created and again attach the
ReadOnlyAccessandIAMAccessAnalyzerReadOnlyAccesspermission policies under “Session policies - optional”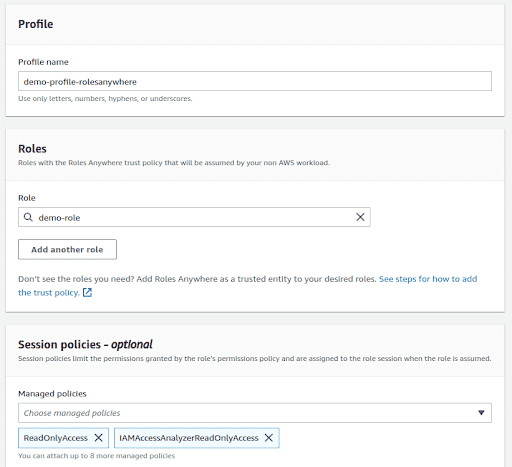
-
Note the profile ARN, once the profile is created
-
Run the following command next, if all steps under “Create an IAM Role that trusts the IAM Roles Anywhere Service Principal” have been completed. This command will generate the AWS Keys, Secret Keys and Session Token.
./aws_signing_helper credential-process --certificate ../../credential-process-data/client-cert.pem --private-key ../../credential-process-data/client-key.pem --trust-anchor-arn <TRUST-ANCHOR-ARN> --profile-arn <PROFILE-ARN> --role-arn <ROLE-ARN> | jq
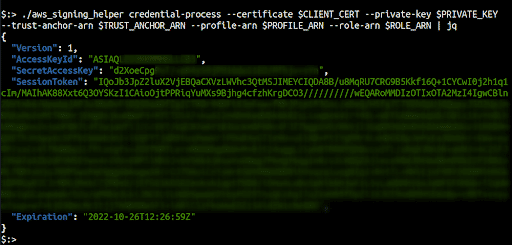
Note: various variables have been exported prior to running the command for brevity
Generate CA certificate for Trust Anchor
- From the cloned github repo, run
./generate-credential-process-data.sh - This creates the certificate bundle in the
credential-process-datafolder - Copy the contents of
root-cert.pemto be used as the External Certificate bundle - Note the names of the
client-cert.pemandclient-key.pemin the same folder, as these are required as arguments when running theaws_signing_helperbinary - Copy the
client-cert.pemandclient-key.pemto the local folder where theaws_signing_helperbinary is present.
Create an IAM Role that trusts the IAM Roles Anywhere Service Principal
- Create a new IAM role under https://us-east-1.console.aws.amazon.com/iamv2/home?#/roles
- Under “Use Case”, from the drop down, select “Roles Anywhere” and click Next
- Attach the
ReadOnlyAccessandIAMAccessAnalyzerReadOnlyAccesspermission policies - Give the role a name and click “Create Role” to create it
- Note the role ARN
Building the aws_signing_helper binary
- Follow the instructions at https://github.com/aws/rolesanywhere-credential-helper#building to build the binary locally
- You will need Go 1.18 or above
- After successfully compiling using
make release, you will find theaws_signing_helper binaryinbuild/bin/
How to use
Using AWS CLI Configure
- On the terminal use
aws configure --profile <new-profile-name> - Provide the value for
AWS Access Key ID - Provide the value for
AWS Secret Access Key - Provide the value for
Default region name

- Open the
~/.aws/credentialsfile and add the following line in the correct profile section
aws_session_token=<aws_session_token_value>

Using Exported Environment Variables
-
On the terminal export the following variables
export AWS_ACCESS_KEY_ID=<aws_access_key>
export AWS_SECRET_ACCESS_KEY=<aws_secret_access_key>
export AWS_SESSION_TOKEN=<aws_session_token>
export AWS_DEFAULT_REGION=<region>
Finally, you can run aws sts get-caller-identity --profile <profile-name> to check if the credentials have been configured properly or not.

References
- https://docs.aws.amazon.com/rolesanywhere/latest/userguide/credential-helper.html
- https://medium.com/cyberark-engineering/calling-aws-services-from-your-on-premises-servers-using-iam-roles-anywhere-3e335ed648be#1582

Riyaz Walikar
Founder & Chief of R&D
Riyaz is the founder and Chief of R&D at Kloudle, where he hunts for cloud misconfigurations so developers don’t have to. With over 15 years of experience breaking into systems, he’s led offensive security at PwC and product security across APAC for Citrix. Riyaz created the Kubernetes security testing methodology at Appsecco, blending frameworks like MITRE ATT&CK, OWASP, and PTES. He’s passionate about teaching people how to hack—and how to stay secure.