Introduction
GitHub is a widely used platform for source code management and many people including students, individual developers, and large dev teams use it day in and day out. The platform provides a way for collaborating with team members working on the same project. Application source code can often contain sensitive information like passwords, access tokens, private key files, etc. that the developers may end up pushing to their GitHub repositories intentionally or unintentionally. This is a security issue as it poses a risk of leakage of sensitive data.
While secrets should never be pushed along with the source code into the repositories, it is often the case. We may not be able to prevent this all the time, but we can conduct regular scanning of our GitHub repositories to ensure that no secrets have made their way into the repository. If there are any, we should spot and remove them before the attackers can get their hands on them.
Automation with GitHub Actions
Secrets scanning can be conducted manually as well as automated in various ways. In this article we are sharing one of the different ways you can follow to implement this process.
GitHub Actions provides a great way to automate software workflows and here we will take a look at how we can automate scanning of GitHub repositories for presence of secrets using GitHub Actions.
This section of the article describes the process to scan a GitHub repository for the presence of secrets. There are a number of secret scanning tools available and one can use the tool of their choice. In this article, our main aim is to demonstrate how GitHub actions can be used for automating our secrets scanning process. We will use Skyscanner’s tool called Whispers for scanning hardcoded credentials in our demo repository and automate the process with GitHub Actions.
GitHub Actions’ Composition
With GitHub Actions, we create a Workflow which defines the Job(s) that we want to run on the occurrence of an Event in the repository or on a defined schedule. GitHub Actions provides custom applications called Actions, that can be leveraged to perform complex tasks within the defined Job(s) neatly. When the Workflow is triggered, it runs the Job(s) on servers called Runners which may be GitHub-hosted or self-hosted.
This is an overview of the components of GitHub Actions and where each component fits in the process. To get a deeper understanding of the components of GitHub Actions, refer to the official documentation.
Defining the Workflow
We will create a Workflow that will define the process for secrets scanning within a GitHub repository. Following are the steps to create a Workflow:
- Login to GitHub and select the repository for which you want to perform secrets scanning
- Create the directory “.github/workflows” in the selected repository
- Create a YAML file inside the above directory in which we will define our Workflow
Crafting the YAML file
We will define our Workflow in the YAML file as following:
- Trigger the Workflow every time a change is pushed to the main branch of our repository. We can specify a selected branch or multiple branches from our repository
- Install and run our secrets scanning tool Whispers to look for any hardcoded credentials in the repository
- Store the scan results in a file. Our scan result file is named
scan_output.json - Finally, upload the scan results to Artifacts so that we can access the results even after Workflow completion. By default, GitHub stores Artifacts for 90 days, but this duration can be customised as per the usage limits. In our Workflow, we have customised the Artifact retention duration to 2 days
# This is our basic workflow for automating secrets scanning with GitHub Actions
name: Secrets Scanning
# Controls when the workflow will run
on:
# Triggers the workflow on push or pull request events for the main branch
push:
branches: [ main ]
# Defining the job(s) to be run to execute secrets scanning
jobs:
# This workflow contains a single job called "Scan-for-secrets"
Scan-for-secrets:
# The type of runner that the job will run on
runs-on: ubuntu-latest
# Steps define the order in which the tasks will be executed
steps:
# Checks-out the repository so our job can access it
- uses: actions/checkout@v2
# Installs secret scanner on the runner
- name: Install Whispers
run: sudo pip install whispers
# Scan repo for secrets
- name: Run scanner for the repository
run: whispers ${{ github.workspace }} > /tmp/scan_output.json
# Upload Artifacts
- name: Upload the scan output
uses: actions/upload-artifact@v2
with:
name: scan_results
path: /tmp/scan_output.json
retention-days: 2
Workflow Execution
Everytime changes are pushed to the main branch of our repository, the above Workflow will
be triggered. To track our workflow during and post execution, follow these steps:
-
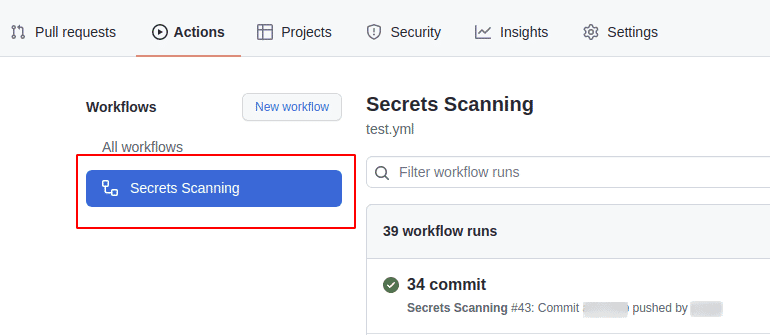
Navigate to your repository in which the Workflow has been created
-
Go to the Actions tab under the repository and select the workflow from the left sidebar. This will filter out the workflow runs for the selected workflow in the main list on the page

-
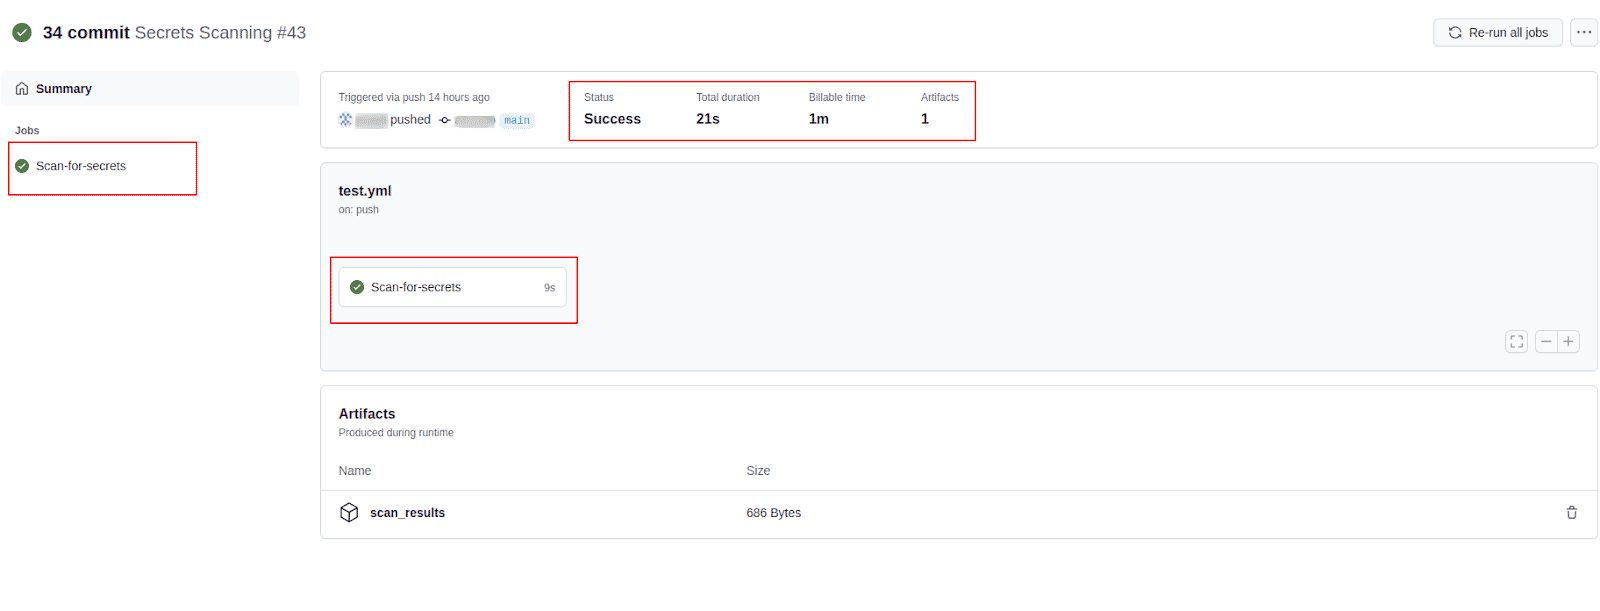
Select the workflow run for which we want to see the details

-
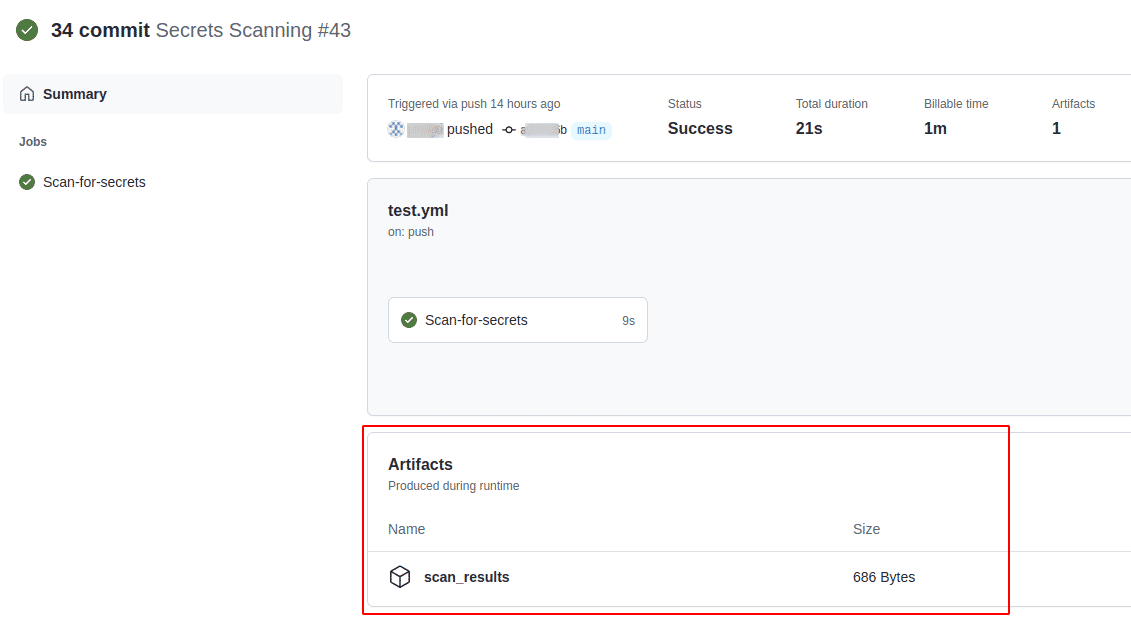
The summary page displays the job(s), status of the job(s) (queued, in-progress, success, or failure), total duration of the workflow run, billable time, and artifacts stored
-
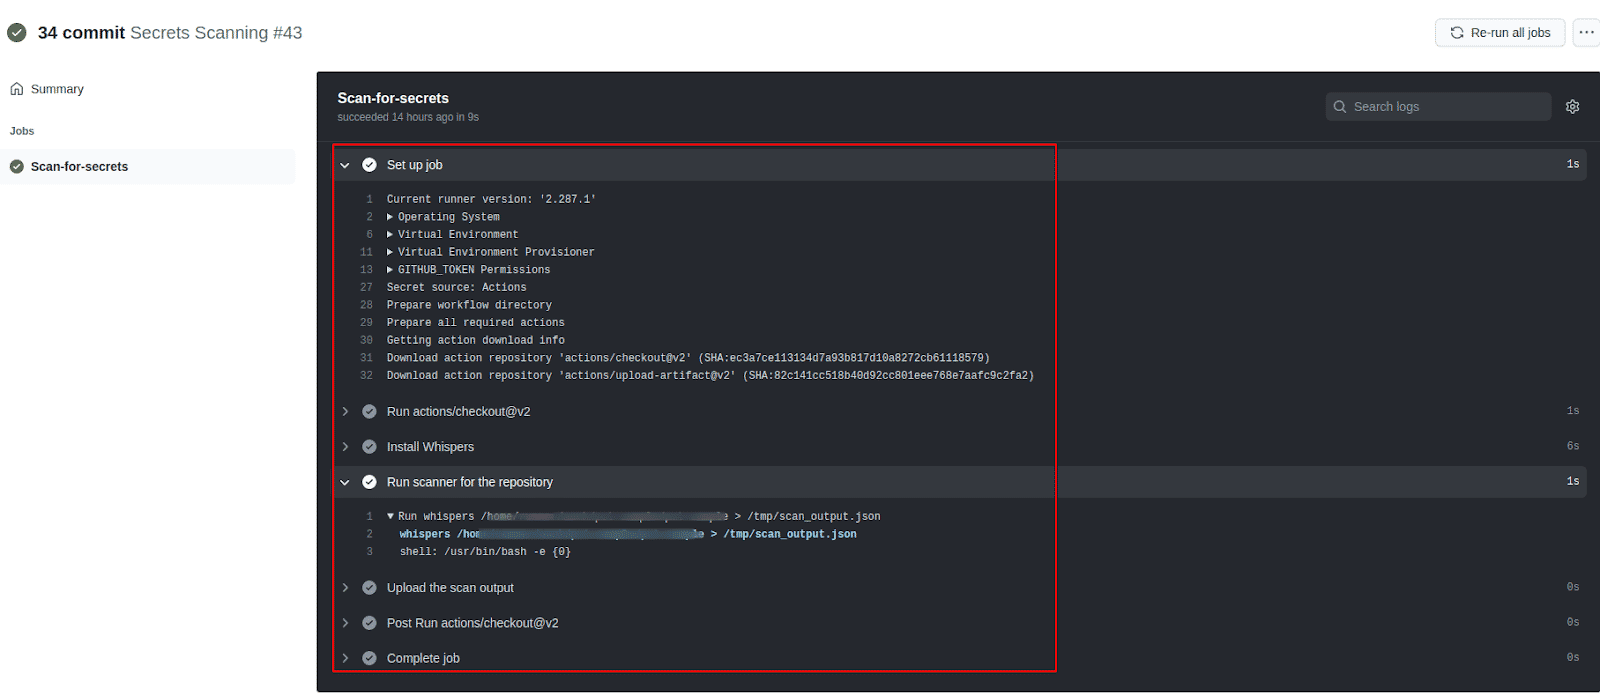
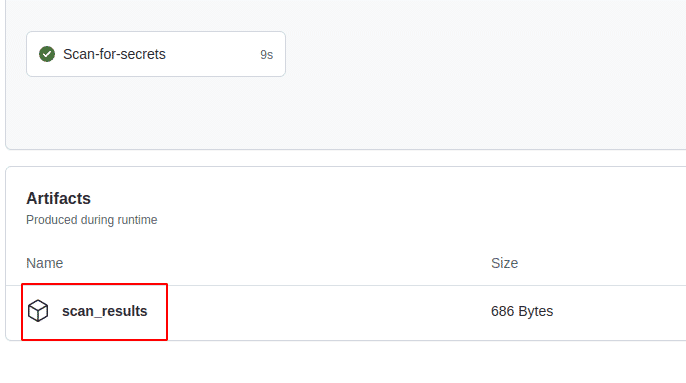
Click on the job name to see the execution details. In our case the job name is Scan-for-secrets
-
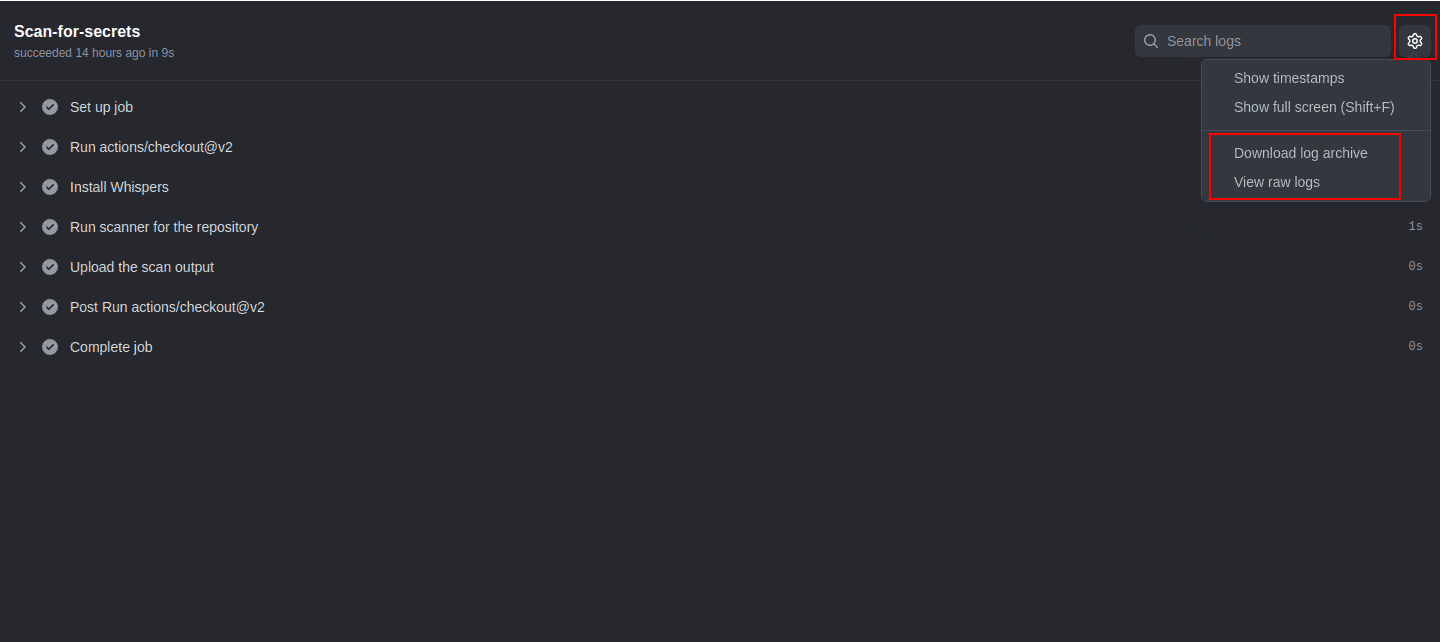
We can see the execution details of each step defined in our job
-
To view raw logs or download log archive for further details or for troubleshooting, click on the gear icon on the right side
Accessing Artifacts
Once our Workflow execution is complete, we may want to access the data at a later point. This can be done with GitHub Artifacts. It allows us to store data, which we can access after the job execution is finished. By default, GitHub stores Artifacts for 90 days, but this duration can be customised as per the usage limits.
To access the Artifacts after job completion, we must first upload the Artifacts when the job is running. This can be done via the “actions/upload-artifact@v2” action available on GitHub. In our Workflow file above, under the Upload Artifacts section of the YAML file, we have defined the action to be used for uploading artifacts, path to the artifact on the runner, and we have also defined a custom Artifact retention duration of 2 days.
Follow the steps below to access the Artifacts post Workflow execution:
-
Navigate to the Actions tab under the repository and select the workflow from the left sidebar
-
Select the workflow run for which we want to access the Artifacts
-
The summary page displays the YAML file name and the Job(s) section. Just below this is the Artifacts section
-
Click on the artifact name which was defined in the Workflow. In our case we defined it as “scan_results”. This will download the artifact in the form of a zip file on the local system
Conclusion
Given the distributed architecture of Git, a number of members can collaborate with each other on various projects. We can lay out the best practices of not committing secrets into the source code repositories, but in reality this issue can crop up every once in a while. Hence, when the best practices get violated, we need to move towards detection and be able to scan for secrets in our repositories at the earliest. Conducting a regular secrets scanning activity on our repositories can help us minimise the risk of sensitive data leakage.
This article is brought to you by Kloudle Academy, a free e-resource compilation, created and curated by Kloudle. Kloudle is a cloud security management platform that uses the power of automation and simplifies human requirements in cloud security. If you wish to give your feedback on this article, you can write to us here.

Riyaz Walikar
Founder & Chief of R&D
Riyaz is the founder and Chief of R&D at Kloudle, where he hunts for cloud misconfigurations so developers don’t have to. With over 15 years of experience breaking into systems, he’s led offensive security at PwC and product security across APAC for Citrix. Riyaz created the Kubernetes security testing methodology at Appsecco, blending frameworks like MITRE ATT&CK, OWASP, and PTES. He’s passionate about teaching people how to hack—and how to stay secure.