Introduction
In our academy article - AWS EBS vs S3 vs EFS, we introduced the three storage services provided by AWS. After covering S3 in our last article, let’s deep dive into AWS EBS volumes in this one!
EBS (Amazon Elastic Block Store) is a type of storage from AWS which provides block level storage volumes. It is primarily used with EC2 instances in AWS and provides persistent data storage. The volumes can be scaled dynamically. We can also modify the IOPS capacity and change the volume type as well.
This article provides a walkthrough of how EBS volumes can be created, attached to and detached from an EC2 instance through the AWS console.
Creating an EBS Volume
-
Log in to your AWS account via console (https://aws.amazon.com/console/)
-
Once you have logged in, search for EC2 in the Search bar
-
Once the EC2 console opens select Volumes on the left side navigation pane under the Elastic Block Store section
-
Click on Create Volume option

-
In the Volume Settings, provide the **Volume Type.**For more details about volume type refer to this AWS documentation ( https://docs.aws.amazon.com/AWSEC2/latest/UserGuide/ebs-volume-types.html )

-
Select the size of the volume as per the requirement.
There are certain constraints on sizing of EBS volumes. For details refer the following documentation ( https://docs.aws.amazon.com/AWSEC2/latest/UserGuide/volume_constraints.html )

-
Select the IOPS for your EBS volume. IOPS is the number of I/O operations per second that the volume can support

-
Throughput is the amount of data transferred from or to a volume. For EBS it is measured in MiB/s.

-
A volume can be attached to an EC2 Instance which is in the same AZ (Availability zone). So select the AZ in which your EC2 Instance is present and to which you want to attach the volume

-
In Snapshot ID select the option Don’t create volume from a snapshot since in this walkthrough we want to create a fresh volume.
You can select the snapshot ID in case you want to create the volume from an existing snapshot.

-
Encryption helps secure your data on EBS volumes. It uses the AWS KMS key to encrypt the data.

-
Create tags which will help to categorise your volumes, the team, or user it belongs etc.

-
Select Create volumeand your volume will be successfully created.

Attaching an EBS Volume to an EC2 instance
-
Once the EBS volume is created select the EBS volume you want to attach to the EC2 Instance. The EBS volume should be in Available state.

-
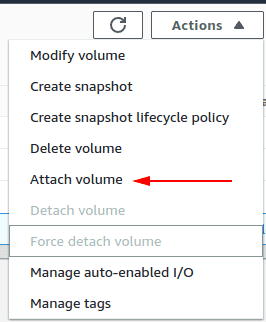
Click on the dropdown of Actions and select the option Attach Volume
-
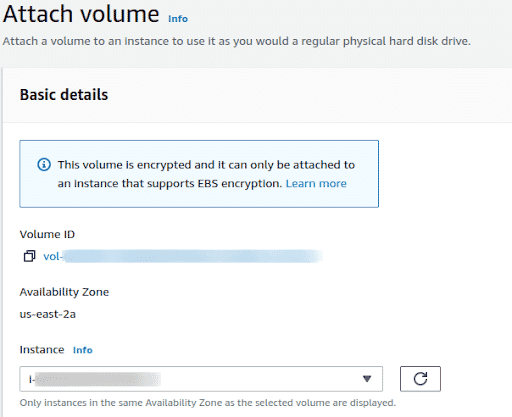
Once the Attach Volume window opens select the EC2 instance you want to attach the volume
-
Select the Device Name which is the same device name used by the EC2 Instance selected in step 3 above

-
Select the Attach Volume option and the volume will be successfully attached. Once the volume is attached to an EC2 instance, the Volume Instance will be In-use.

Detach an EBS Volume
-
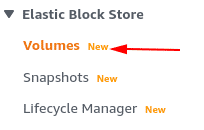
In the Amazon EC2 console, choose Volumes in the navigation pane on the right side
-
Once the Volumes page opens, select the volume you want to detach. An attached volume shows in-use state

-
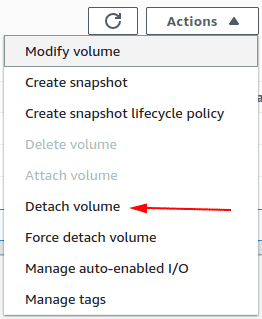
Click on the Actions drop-down and select the Detach volume option.
-
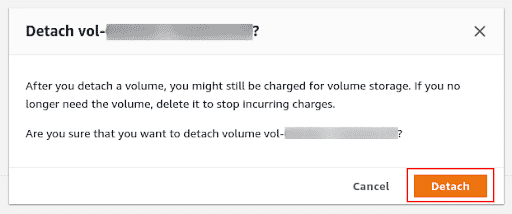
A pop-up will appear for confirmation, select the Detach button to detach the volume from the EC2 instance.
-
Once you have successfully detached the volume you can again see that the volume is in Available state.
Conclusion
EBS volumes provide persistent storage and can be used just like physical hard drives for storing data. This article provides a step-by-step walkthrough of how you can create EBS volumes. It also covers how you can attach and detach volumes to your EC2 instances.
Follow along this article if you are looking to start out with EBS volumes and stay tuned for our next academy article where we will be covering a walkthrough for AWS EFS service.

Riyaz Walikar
Founder & Chief of R&D
Riyaz is the founder and Chief of R&D at Kloudle, where he hunts for cloud misconfigurations so developers don’t have to. With over 15 years of experience breaking into systems, he’s led offensive security at PwC and product security across APAC for Citrix. Riyaz created the Kubernetes security testing methodology at Appsecco, blending frameworks like MITRE ATT&CK, OWASP, and PTES. He’s passionate about teaching people how to hack—and how to stay secure.