Background
One of the most daunting security tasks most folks in the industry face is to securely create and manage passwords and keys. In the worst case scenario, you have users who reuse the same password and key across multiple servers and applications. The passwords especially in such scenarios end up being easy to remember and thus prone to brute force and guessing attacks.
There are numerous password manager solutions in the market which can be hosted on-premise, exist as SaaS solutions or can be locally installed programs. Each having their own advantages. However, when working across multiple geographies and teams, you require a solution that can be used to securely exchange these keys and passwords with your other team members.
1Password is one such cloud hosted password manager developed by AgileBits Inc. It provides a place for users to store various passwords, software licences, and other sensitive information in a virtual vault that is locked with a PBKDF2-guarded master password. You can add team members to the vault so that the credentials are available in a distributed manner to the team.
This post will take you through performing an audit on the users and their access within 1Password so that you can identify any rogue users or team members who should not have been a part of the SaaS application in the first place.
The User and Access audit can be performed using both the CLI and the web dashboard. Let’s take a look at the CLI way of doing this first.
Steps for setting up the command-line tool
-
Download the 1Password CLI tool for your platform through this link https://app-updates.agilebits.com/product_history/CLI.
-
To verify its authenticity, use GnuPG and the .sig file included in the download:
gpg --receive-keys 3FEF9748469ADBE15DA7CA80AC2D62742012EA22 gpg --verify op.sig op -
Move op to /usr/local/binor another directory in your $PATH.
-
To verify the installation, check the version number:
op --version
While using the 1Password CLI for the first time we need to enter the sign-in address and email address. Over here example.1password.com is the sign-in address of your account and abc@example.com is the email address.
op signin example.1password.com abc@example.comAfter this, the CLI will ask to enter your Secret Key and 1Password account password. Now you are successfully logged in through CLI.
To make sure the 1Password CLI recognises the session that just got created with you logging in, you can set the OP_SESSION_EXAMPLE environment variable. The export command to do this is printed to screen upon successful login.
export OP_SESSION_exampleorg="v4L82rS0SQpoALO6H2thZR7V8t34dIek9k4OSdUX2HTQ"Steps For enumerating Users and their access level
The output of all the CLI commands is in unformatted JSON. We pipe the commands to the jq binary to receive formatted readable JSON. This is an optional part of our commands.
We start with listing all users across our organisation. This is done using the command
op list users | jq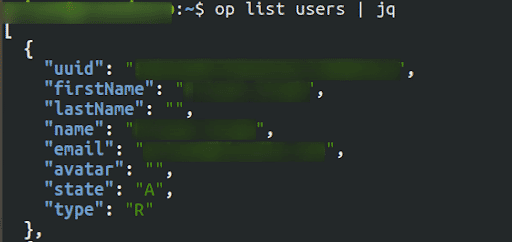
To get more information about specific users you can use the below command
op get user emailThe value of “state” in the response tells us if the user is “Active” or “Suspended”.
To enumerate the access of each user to see which vault they have access to, you need to first enumerate the vault ids and then for each vault you can list the users that have access to them
op list vaults | jq
op list users --vault vault-id | jq
You can enumerate users for each vault and then identify which users are not supposed to have access to these vaults.
Steps for enumerating users and access via the web dashboard
The dashboard provides a very intuitive interface to generate reports and usage statistics. Far more detailed than the CLI in some aspects.
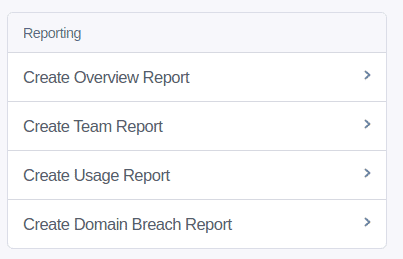
To begin with, let’s generate a report that shows user information
-
Login and navigate to the to 1Password web dashboard at /dashboard
-
Under the Reporting section click on “Create Team Report”
-
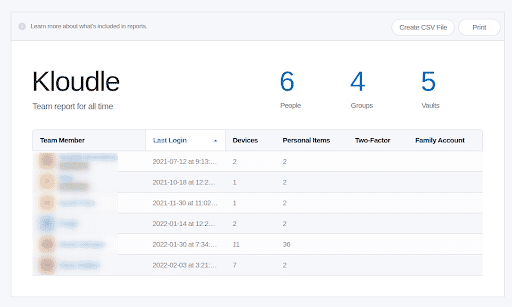
The generated report shows all the users in the system and their status.
-
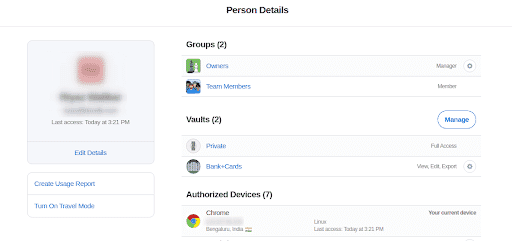
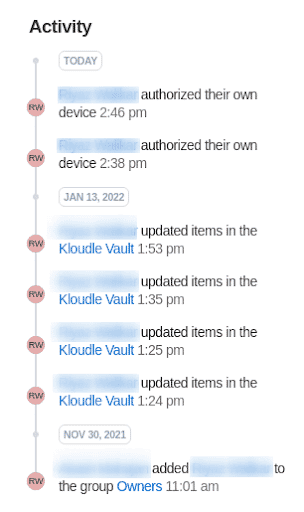
To see what vaults the users have access to, you can click on a user name and see the details for the user. This page shows what groups the user belongs to and what vaults they have access to. A list of Authorized devices and the current active session is also displayed.
-
The page also shows security activity which can be used to identify any suspicious actions that could have led to a breach in security.
Conclusion
1Password as a tool is great at keeping your credentials secure and shared amongst your team members. The product also informs you of password breaches and checks for any weak, compromised, or duplicated passwords and lets us know which sites are missing two-factor authentication or using unsecured HTTP etc. amongst other things.
Given that unauthorized access to 1Password could mean access to sensitive infrastructure credentials and potentially access to company data, it is important to perform periodic audits to make sure the users and their access is well accounted for. These audit reports can be used to perform root cause analysis in the event of an incident or as a security hygiene practice.
***
This article is brought to you by Kloudle Academy, a free e-resource compilation, created and curated by Kloudle. Kloudle is a cloud security management platform that uses the power of automation and simplifies human requirements in cloud security. If you wish to give your feedback on this article, you can write to us here.