Introduction
Within the Google Cloud hierarchy, we have Organisation at the root, under which we have Folders, and then Projects at the base of it. Projects contain the Google Cloud services that we use. In a Project one can find the set of users, authentication, billing, set of API’s and monitoring settings for the APIs.
We can create one or more Google Cloud Projects in the same account to organise our resources. In this article, we will take a look at how we can create a new Google Cloud Project.
Creating a new Project
Here is a quick step by step guide on creating a new Google Cloud Project.
-
Log in to your Google Cloud Account
-
Once you have logged in, open the Manage Resources page.
-
Click on Create Project button

-
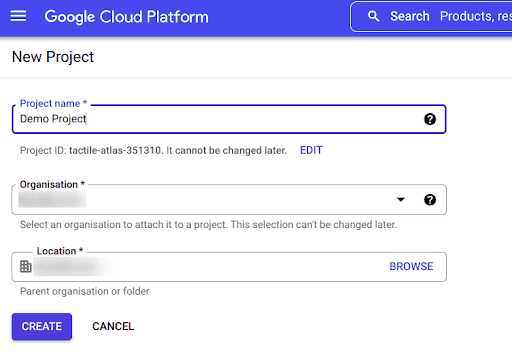
Enter the Project Name you want to give to your project. Then select the organisation under which to create the project. In case you have a free trial version of Google Cloud, then this option will not be available to you
After this, enter the location for your project which can be the parent organisation, if present or a folder

-
Click on the Create button and the project will be created
-
Open the Manage Resources console and you can see the newly created project

Conclusion
In Google Cloud, a Project helps in organising all the Google Cloud Resources. Once you have created a Project, you can start using Google Cloud services and creating resources like users, VMs, storage, etc. This article serves as a step by step walkthrough for creating a new Google Cloud Project.

Riyaz Walikar
Founder & Chief of R&D
Riyaz is the founder and Chief of R&D at Kloudle, where he hunts for cloud misconfigurations so developers don’t have to. With over 15 years of experience breaking into systems, he’s led offensive security at PwC and product security across APAC for Citrix. Riyaz created the Kubernetes security testing methodology at Appsecco, blending frameworks like MITRE ATT&CK, OWASP, and PTES. He’s passionate about teaching people how to hack—and how to stay secure.