Introduction
Elastic Load Balancers (ELBs) need to have logging enabled to ensure the logs are available for debugging, troubleshooting, and incident response activities. Access logs contain information such as the time the request was received, the client’s IP address, latencies, request paths, and server responses.
Each access log file is automatically encrypted using SSE-S3 before it is stored in your S3 bucket and decrypted when you access it. You do not need to take any action; the encryption and decryption is performed transparently. Each log file is encrypted with a unique key, which is itself encrypted with a master key that is regularly rotated.
Logging allows for an audit trail to be created in the event of an attack or malicious activity being detected. When logging is not enabled, this ability is absent which could allow potential attackers to hide within the traffic. This could allow attacks to go undetected, causing further loss in data and access.
Steps to Enable Access Logging in ELB
-
Login to the AWS Management Console and navigate to EC2 dashboard.
-
In the navigation panel, under Load Balancing, click Load Balancers.
-
Select the Elastic Load Balancer that you want to update.
-
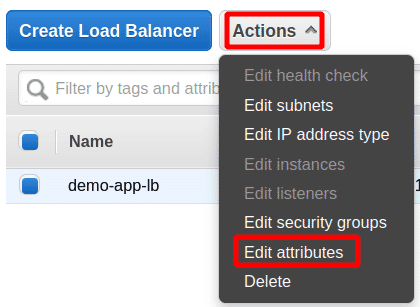
Click on Actions dropdown and select Edit attributes
-
In the Access Logs dialog box, set the following:
- Check Enable Access Logs checkbox to enable the feature.
- For S3 Location, enter a name and a prefix for the S3 bucket that will store the log files. Check Create the location for me to enable AWS to create the new bucket for you. If you don�t request this option, you must provide the name of an existing bucket available in the same region with the load balancer.

-
Click on Save

Riyaz Walikar
Founder & Chief of R&D
Riyaz is the founder and Chief of R&D at Kloudle, where he hunts for cloud misconfigurations so developers don’t have to. With over 15 years of experience breaking into systems, he’s led offensive security at PwC and product security across APAC for Citrix. Riyaz created the Kubernetes security testing methodology at Appsecco, blending frameworks like MITRE ATT&CK, OWASP, and PTES. He’s passionate about teaching people how to hack—and how to stay secure.