Introduction
Kubernetes is the most popular container orchestration tool you will encounter when speaking to developers and infrastructure administrators alike. It can be installed in various ways, on different types of hardware and all major cloud infrastructure providers have at least one version of a managed Kubernetes service.
This post will show you how you can set up a simple 2 node Kubernetes cluster using kubeadm on top of Ubuntu virtual machines running on Google Cloud. You can replicate the steps on any other cloud provider or even locally, as long as the pre-requisites are being met.
The 2 nodes will be
- a control plane node (earlier called master node) and
- a worker node
Pre-requisites
Two identical Ubuntu 20.04 (or above) virtual machines with
- At least 2 vCPUs
- At least 4 GB RAM each
- At least 10 GB of disk space
- Ability to SSH to these machines as a non root user
- Root access via a sudo user (more secure) or root credentials (less secure)
The pre-requisites can be local VMs in Oracle VirtualBox/VMWare running on your laptop or cloud compute instances on Google Cloud, Azure or AWS (insert any other provider here).
Setting up Kubernetes
Rename one of the machines as “control-plane” and the other as “worker-node” to easily distinguish between the two and run commands on the correct machine.
Preparing the control plane
SSH to the “control-plane” machine and switch to root using sudo -i
-
Disable swap space using the following command
swapoff -a -
Comment the reference for swap in fstab
vi /etc/fstab
- Configure iptables to receive bridged traffic
vi /etc/ufw/sysctl.conf
net/bridge/bridge-nf-call-ip6tables = 1
net/bridge/bridge-nf-call-iptables = 1
net/bridge/bridge-nf-call-arptables = 1
- Install ebtables and ethtool
apt-get install ebtables ethtool -y
- Enable required kernel modules. Create/edit
/etc/modules-load.d/k8s.confand add the following lines
overlay
br_netfilter
- Run modprobe to enable kernel modules
modprobe overlay
modprobe br_netfilter
- Add bridge rules and IPv4 forwarder rules to a conf to load at reboot. Create/edit
/etc/sysctl.d/k8s.confand add the following lines
net.bridge.bridge-nf-call-iptables  = 1
net.bridge.bridge-nf-call-ip6tables = 1
net.ipv4.ip_forward                 = 1
-
Reboot the machine
-
Add Kubernetes repo key to key manager (install curl with apt install curl, if absent).
curl -s https://packages.cloud.google.com/apt/doc/apt-key.gpg | sudo apt-key add - -
Add Kubernetes repo to the machine
sudo -i cat <<EOF >/etc/apt/sources.list.d/kubernetes.list deb http://apt.kubernetes.io/ kubernetes-xenial main EOF -
Install
kubeadm,kubeletandkubectlusingsudo apt-get update sudo apt-get install kubelet kubeadm kubectl -y
Setting up Containerd instead of Docker for Ubuntu
Kubernetes removed support for Docker via Dockershim from v1.20 onwards. We use the containerd runtime to set up our Container Runtime Interface (CRI)
- Edit/create
/etc/modules-load.d/containerd.confand add the following lines
overlay
br_netfilter
-
Run
sysctl --systemto reload sysctl configurations -
Install containerd dependencies
apt install curl gnupg2 software-properties-common apt-transport-https ca-certificates -y
- Add the containerd repository
add-apt-repository "deb [arch=amd64] https://download.docker.com/linux/ubuntu $(lsb_release -cs) stable
- Install containerd
apt update && apt install containerd.io -y
- Load default containerd configurations and update the usage of
systemdCgroup
mkdir -p /etc/containerd
containerd config default>/etc/containerd/config.toml
sed -i 's/SystemdCgroup = false/SystemdCgroup = true/g' /etc/containerd/config.toml
service containerd restart
service kubelet restart
- Restart containerd service
systemctl restart containerd
systemctl enable containerd
Preparing the worker node
-
SSH to the “worker-node” machine and switch to root using sudo -i
-
Repeat steps from Step 2 to Step 9 from the previous section
-
Basically, the “worker-node” also must have
- Swap turned off and commented out in /etc/fstab
- Iptables configured to receive and send bridged traffic
- Ebtables, ethtool, containerd, kubeadm, kubelet and kubectl installed using apt package manager.
Creating the Kubernetes cluster
-
Obtain the external IP address/IP address that you will connect to, of the control-plane machine. Our setup is in Google Cloud, so we work with the Public IP address of the VM that is reserved in Google Cloud. Skip this step if your cluster is internal.
-
Initialize the cluster with the following command
- Note: You can skip
--apiserver-cert-extra-sans=<EXTERNAL-IP-ADDRESS-OF-CONTROL-PLANE>if your cluster is supposed to be an internal cluster (not exposed to the Internet).
- Create the cluster with the following command. We are adding the
--pod-network-cidrswitch as Cilium will be running in the cluster
kubeadm init --pod-network-cidr=10.1.1.0/24 --apiserver-advertise-address IP_ADDRESS_OF_NODE_FROM_IFCONFIG --apiserver-cert-extra-sans=EXTERNAL-IP-ADDRESS-OF-CONTROL-PLANE
- Note the
kubeadm joincommand that was printed. This will be used to join other nodes to the cluster If no join command was printed then run the following to obtain the command
kubeadm token create --print-join-command
-
Open another SSH session to the control-plane machine and prepare the system to add workloads. Do not switch to root user for this.
mkdir -p $HOME/.kube sudo cp -i /etc/kubernetes/admin.conf $HOME/.kube/config sudo chown $(id -u):$(id -g) $HOME/.kube/config -
Check the status of the node to confirm that the node is not in a Ready state because the CNI has not been configured.
-
Download and install Cilium on the Control Plane node
curl -LO https://github.com/cilium/cilium-cli/releases/latest/download/cilium-linux-amd64.tar.gz
sudo tar xzvfC cilium-linux-amd64.tar.gz /usr/local/bin
rm cilium-linux-amd64.tar.gz
sudo cilium install
- When the message “Cilium was successfully installed!” is printed, run
kubectl get nodesto see node status. The node should be in Ready status.
Connecting the worker node with the control plane
-
SSH to the “worker-node” and switch to root user
-
Run the
kubeadmjoin command that was printed when the control-plane was set up earlierkubeadm join --token <token> <control-plane-host>:<control-plane-port> --discovery-token-ca-cert-hash sha256:<hash>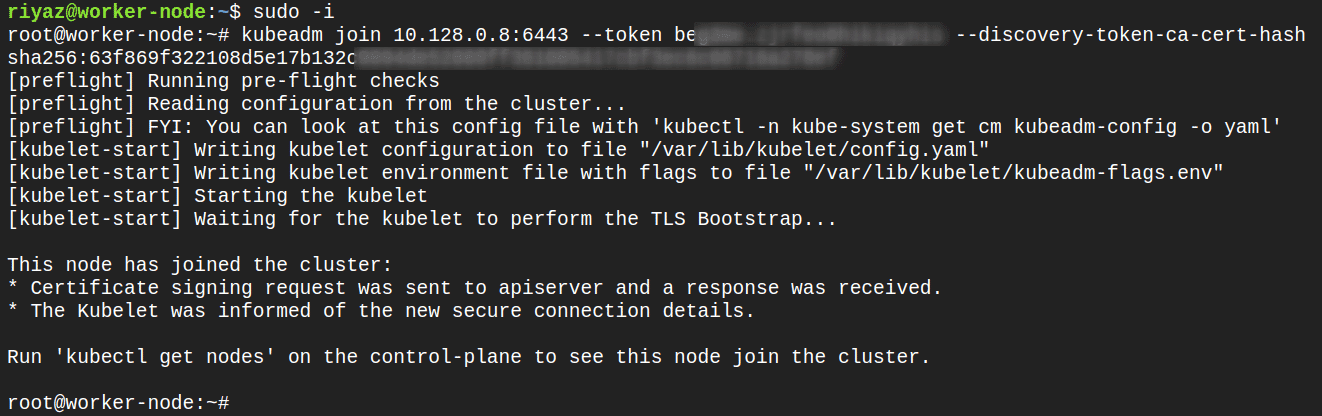
-
If token has been generated then run the
kubeadm joincommand on the node that needs to be joined to the cluster
kubeadm join --token <token> <control-plane-host>:<control-plane-port> --discovery-token-ca-cert-hash sha256:<hash>
-
You can obtain the token again by
kubeadm token list. If token has expired use,kubeadm token create -
If you don’t have the value for
--discovery-token-ca-cert-hash, then generate a new value on the master node
openssl x509 -pubkey -in /etc/kubernetes/pki/ca.crt | openssl rsa -pubin -outform der 2>/dev/null | openssl dgst -sha256 -hex | sed 's/^.* //'
- Go back to the master node and run
kubectl get nodescommand to see the status of the nodes
Verifying if the set up is complete
Run the kubectl get nodes command to verify the both the nodes are in Ready state and version numbers are listed.

Alternatively, you can also run the following commands
kubectl get pods -A
kubectl cluster-info
References
- https://kubernetes.io/docs/setup/independent/install-kubeadm/
- https://kubernetes.io/docs/setup/production-environment/tools/kubeadm/install-kubeadm/

Riyaz Walikar
Founder & Chief of R&D
Riyaz is the founder and Chief of R&D at Kloudle, where he hunts for cloud misconfigurations so developers don’t have to. With over 15 years of experience breaking into systems, he’s led offensive security at PwC and product security across APAC for Citrix. Riyaz created the Kubernetes security testing methodology at Appsecco, blending frameworks like MITRE ATT&CK, OWASP, and PTES. He’s passionate about teaching people how to hack—and how to stay secure.