Introduction
In our last academy article we introduced 3 different storage services provided by AWS - EBS, S3, and EFS. Article link: https://kloudle.com/academy/aws-ebs-vs-s3-vs-efs-differences-use-cases
We also mentioned that we would be covering each of these services separately in the upcoming articles, so here is our academy article on creating an S3 bucket on AWS.
Let’s recap our S3 understanding before we get into our hands-on walkthrough of S3 buckets. S3 (Amazon Simple Storage Service) is an object type storage from AWS. We can store data files such as image files, text files, video files, etc. as objects within buckets. It provides this storage through a web service interface. S3 also allows versioning which helps in preserving, recovering and restoring an early version of any object stored in the bucket.
Setting up an S3 bucket through AWS console
-
Log in to your AWS account via console (https://aws.amazon.com/console/)
-
Once you have logged in, you can search for S3 in the Search bar

-
Click on S3 from search results under Services. This will take you to your S3 page where you can create and manage your S3 buckets
-
Click on “Create bucket” button to set up a new S3 bucket

-
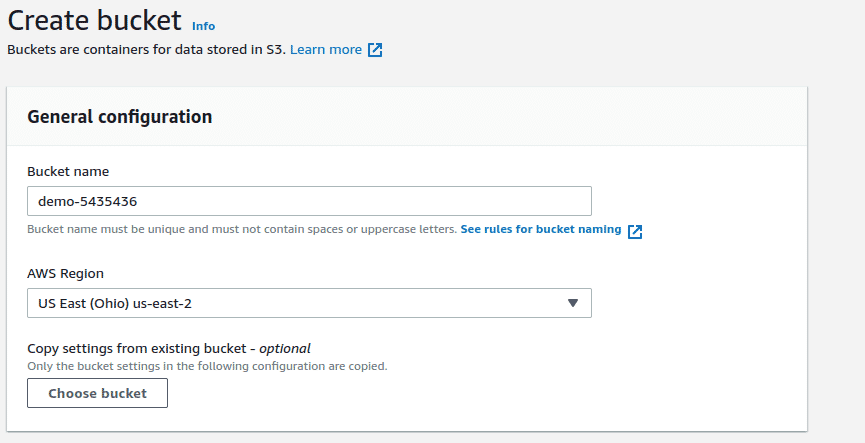
You will then be presented with the bucket configuration page
-
Enter a unique name for your S3 bucket without using any spaces or upper case letters. The bucket names must be unique since the S3 bucket namespace is global
-
Select the region in which you would like to create your S3 bucket. It is generally suitable to create the bucket in a region that is geographically closer to the users of the bucket

-
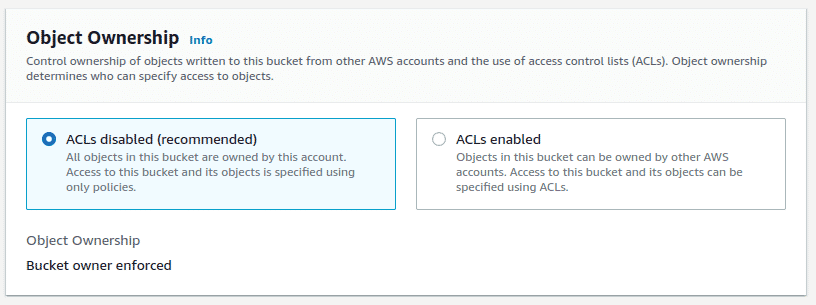
The next configuration section allows you to manage the ownership of objects. S3 provides two options for object ownership: ACLs disabled and ACLs enabled
ACLs disabled means all the objects in the bucket are owned by the account that created the bucket
ACLs enabled means that the objects can be owned by the other AWS accounts as well

-
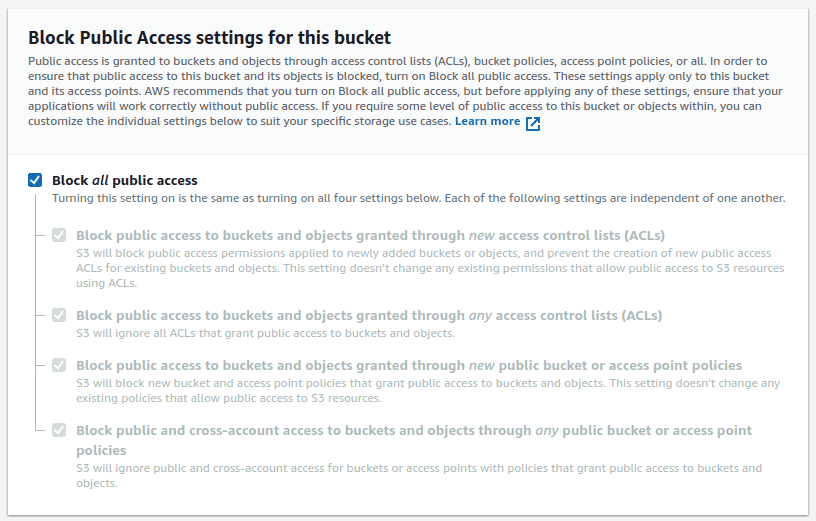
Select the accessibility option for your bucket. If your bucket contains any sensitive data or any data which you do not want to make public then select “Block all Public access” setting for this bucket

-
Then you can enable or disable Bucket Versioning for your S3 bucket.
Bucket Versioning is a feature provided by S3 which allows you to have multiple versions of an object. When it is important for you to ensure that your objects do not get overwritten or deleted, you can enable this feature.

-
Assign Tags to your bucket. Though this is an optional feature, Tags can be attached to categorise your bucket in various ways like environment, teams, createdby, etc.

-
Select whether you want to enable or disable default encryption for your objects. Default encryption is a great security feature when you want to protect your objects stored in S3 buckets

-
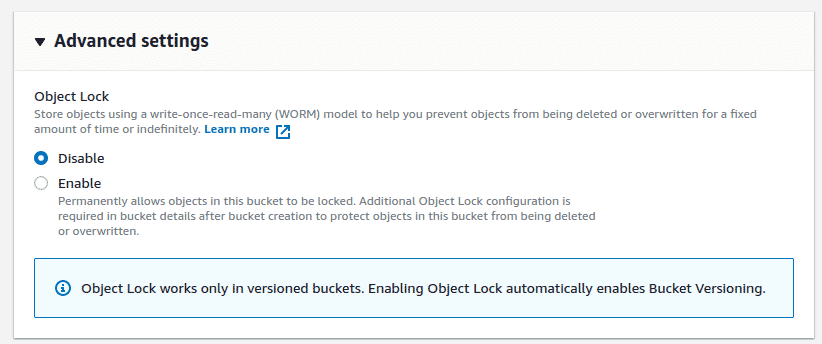
There’s also a section of Advanced settings in S3 configurations which allows you to enable or disable object locking
Object Lock is helpful when you want to prevent the stored object in S3 bucket from getting deleted or overwritten. Enabling this setting automatically enables the bucket versioning if not enabled

-
Finally click on “Create bucket”. The bucket is created and you can start storing data to your newly created S3 bucket

Conclusion
S3 provides various features and options when creating a new bucket. This article provides you a step by step walkthrough of creating an S3 bucket on AWS while explaining various options available to you. Enabling or disabling each of these options depends on how and for what you want to use your bucket. Some options may also have a cost or quota factor applicable, hence you must take that into notice as well.
We have also covered the top 10 security best practices for securing data in Amazon S3. Check out this academy article to make sure you are following the best practices or not.
Article link: https://kloudle.com/academy/top-10-security-best-practices-for-securing-data-in-amazon-s3

Riyaz Walikar
Founder & Chief of R&D
Riyaz is the founder and Chief of R&D at Kloudle, where he hunts for cloud misconfigurations so developers don’t have to. With over 15 years of experience breaking into systems, he’s led offensive security at PwC and product security across APAC for Citrix. Riyaz created the Kubernetes security testing methodology at Appsecco, blending frameworks like MITRE ATT&CK, OWASP, and PTES. He’s passionate about teaching people how to hack—and how to stay secure.